BBQ weather! The recipe everyone needs…

It’s time for a recipe. I’ve been working on an exciting project with a charity called Find Your Feet which runs a brilliant campaign called ‘Curry for Change’ every year. This encourages anyone who can cook, from top restaurant chefs like Vivek Singh to supper club hosts and food bloggers, to hold events to raise money for people suffering from food poverty in Asia and Africa. Click on the link to find out how you can join in!It’s a great campaign that I have supported in the past and this year I am helping them with a new angle to the campaign which encourages home cooks to host a dinner party at home. This is called ‘Host at Home’ and what with my ambition to get everyone cooking authentic Indian food and curries from scratch, at home, it was a no-brainer for me to offer my services to help them.

So watch this space for my Host-at-Home recipe pack, which will come with full recipes for a 3 course meal and step-by-step instructions on how to deliver a fabulous evening with a minimum of stress and fuss. As I was working on my recipes, I realised that there is one recipe I use probably once a week during the summer that I haven’t shared for quite a while.

Sheek kebabs are traditionally made with minced meat, often mutton but they can be made with beef, lamb, pork, turkey or anything else you like to eat to be honest. If I can’t get mutton, my preference is to use a mixture of lamb and beef mince, as I think you get the depth of flavour from the beef and the nice juiciness that comes from the higher fat content in the lamb.

The recipe is in fact terribly simple. Shove all the ingredients in a bowl together and mix them really, really well. I don’t mean just move them around in a clockwise direction, I mean really get in there and squish it all together so that every mouthful of the finished kebab is soft and yielding, and has a good mix of all the flavours and spices. And then you grill them. Simples!

The mixture can be made well ahead of time (24 hrs in advance if necessary) and stored in the fridge. At the last minute add the lemon, form the kebabs on skewers and the grill on a pre-heated barbecue for 6-8 minutes. Job done! Served with yoghurt raitha and some salad, these kebabs will enliven any BBQ spread. Much more interesting than just the usual burgers and sausages. So give this super-simple and delicious recipe a try and I promise you won’t be disappointed.

Recipe: Sheek kebabs

  • 600g minced beef or lamb (or a mixture)
  • 2 tsp garam masala
  • ½ tsp turmeric
  • 1½ tsp ground cumin
  • 1½ tsp ground coriander
  • 1 tsp chilli powder
  • 1 tsp salt
  • 1 red onion finely diced
  • 1½ tbsp garlic paste (crushed or grated fresh garlic is perfect)
  • 1½ tbsp ginger paste (crushed or grated fresh ginger is perfect)
  • 2 green chillies, finely chopped
  • big handful of chopped coriander (or mint and parsley)
  • 1 egg, beaten
  • 40-50g breadcrumbs*
  • zest and juice of half a lemon

Method

  1. Place the minced meat in a large mixing bowl, and add in all the other ingredients. Mix together really well, with hands is always best! If you can leave the mixture to develop the flavours for an hour or two, the resulting kebabs will be better. If the mix feels too wet, add more breadcrumbs. If it is too dry you may need to add more egg. If you are preparing the mixture in advance, leave out the lemon zest and juice and only add this just before cooking.
  2. Divide the mixture into 16 equal portions, by dividing the mixture in half and then half again until you end up with 16 balls of kebab mix. Take each portion and roll into a long thin sausage shape; the easiest way is to crimp it around a metal or bamboo skewer. Wet your hands between each ball for a smooth finish. Press the mixture together well whilst shaping the kebabs to ensure you have a good texture to the finished product.
  3. Once formed, cover with cling film and allow the kebabs to rest in the fridge until you are ready to cook them (at least 30 minutes). When you are ready to cook, pre-heat your BBQ to a medium-high heat. Carefully place the kebabs onto the BBQ and grill. The kebabs will need to be turned several times, but wait until they have a good caramelised colour on one side before turning to avoid them breaking apart during cooking. They should only take 6-7 minutes, but always check the meat is cooked to your liking before serving. Serve with raitha and lots of salad dressed with lemon juice, oil and a pinch of salt.


* if you need to make these gluten-free you can use GF breadcrumbs or gram flour instead

Sweet treats in the Shire

This time a year ago we were in North Devon. We stayed in a pretty little village called Chittlehampton near Barnstaple, although Jim insisted on calling it the Shire. I think this was mainly influenced by the fact that the cottage (which he called Bag End) had very small doors and low ceilings which meant that the only place Jim could stand up straight was on the stairs, he had to shower on his knees and bend nearly double to get through the doors. I, on the other hand, found the cottage perfectly proportioned and very cosy with the added bonus that I could reach all the cupboards and fittings very easily.

We had a good time, helped enormously by the fact that the village had a great pub called the Bell Inn, which served good food and had an extensive gin list, including a new one on me, Wicked Wolf of Exmoor, a small batch-made spirit made in the wilds of Exmoor. The village also boasted a post office and shop which sold locally-made cheddar and clotted cream which you had to request from behind the counter and was spooned into a unmarked plastic tub for you to take home with you.

I got baking as soon as we got home. Which of course meant we had to have the following 3 arguments:

  • is it scone rhyming with cone, or scone rhyming with gone?
  • should scones have sultanas in?
  • jam then cream, or cream then jam?

I’m not even going to try and answer the first question as I know it raises considerable agitation with certain people. I heard that the Queen says scone rhyming with ‘gone’, so that is some guidance I guess. I like sultanas but Tommy doesn’t, so we tossed a coin and he won. The Cornish tea has jam and then cream on top (which I prefer, with apologies to my Devonian mother-in-law) and the Devon cream tea should have the cream on first. What a minefield to pick your way across for a tea-time treat. The clotted cream was delicious, which was the main thing.

After a short break, I usually feel energised to get back into the creative side of cooking, so I decided to tackle something I have been meaning to try for ages. Marshmallows. I had bought a sugar thermometer a while ago but it was still in its packet and buried at the back of a drawer. But I found it and got to work.

The ingredients are really quite simple: white sugar, liquid glucose (which you can find in most supermarkets with the baking ingredients), water, gelatine leaves, egg whites and vanilla. The only tricky bit is getting the temperature of the sugar correct, but the thermometer takes all of the guess work out of that. The sugar has to be heated to the hardball stage. When I told Jim I was going to play hardball with the sugar he hurried out of the kitchen in case it turned violent.

I used a James Martin recipe for my first attempt and it worked really well. The main thing to bear in mind is that it takes quite a while for the sugar syrup to get to the right temperature. I used my digital thermometer as well because I didn’t trust the analogue one, but it worked okay. It is important to be very careful with hot sugar, don’t ever touch it with your fingers and use a good sturdy Pyrex jug to pour it onto the egg whites slowly. This is not a recipe to do with small children I would say. The other thing is that you will have to wash everything in very hot water afterwards as it is the only way to deal with the hardened sugar.

But it really wasn’t difficult and the results were absolutely delicious. Soft, pillowy, melt-in-the-mouth, more a texture than a flavour, and I felt inordinately proud of myself when they were done. If you want to have a go, here is the recipe I used:

Ingredients

450g granulated sugar

1 tbsp liquid glucose

200ml water

2 large free-range egg whites

9 sheets gelatine, soaked in 140ml water

1 tsp vanilla extract

vegetable oil, for greasing

5-6 tbsp icing sugar, for dusting

5-6 tbsp cornflour, for dusting

Method

  1. Soak the gelatine leaves in 140ml cold water in a small bowl.
  2. Place the granulated sugar, glucose and 200ml of water into a heavy-duty saucepan and bring to the boil.
  3. Cook over a medium-high heat until it reaches 127ºC or the hard ball stage on a sugar thermometer. This could take up to 15 minutes.
  4. Place the egg whites into a very clean grease-free bowl and whisk to firm peaks. An electric whisk or stand mixer is best as there is a lot of whisking!
  5. Add the soaked gelatine sheets and water to the hot sugar syrup carefully. Stir through until dissolved, then pour into a heatproof jug.
  6. Continue to whisk the egg whites, then pour the sugar syrup onto the egg whites, whisking all the time until the whites are shiny. Try not to pour the syrup directly onto the whisk attachments but rather down the side of the bowl.
  7. Add the vanilla extract and continue to whisk at a medium-high speed for at least 5 minutes, but it may take up tot 10 minutes. The mixture needs to be thick enough to hold its shape on the whisk.
  8. Lightly oil a shallow 30x20cm baking tray and dust the tray with some icing sugar and cornflour. Spoon the marshmallow mixture into the tray, smoothing the top with a palette knife.
  9. Place in the fridge for at least an hour to set.
  10. Dust some more icing sugar and cornflour over a board or clean work surface, use a palette knife to loosen the edge of the marshmallow, then turn it out onto the dusted work surface.
  11. Cut into squares and roll in the icing sugar and cornflour to coat well and then store in an airtight tin or jar. Serve with chocolate sauce or fruit coulis for a yummy dessert .
N.B. this blog first appeared as a column in Herts & Essex Observer on 25 February 2016

Olympic standard preparation for a tasty summer menu

Olympic fever has taken hold again; the almost irresistible pull has me hooked on all sorts of sports that I would never usually watch and it has been great fun. Every four years I get drawn in, and though the time difference is playing havoc with my sleep, it is certainly worth it so far and Team GB are making us so proud yet again.

What I love about the Olympics is how sportspeople from a wide variety of backgrounds have their chance in the limelight for a few days every four years. But what really fascinates me is the back story. It’s the certain knowledge that, aside from a few high-profile names, the vast majority of Olympians spend nearly every day of the year training, without the adulation of the crowds or the world’s media; getting up early, travelling to meets in the back of beyond with little prospect of prize money or recognition. It’s the single-mindedness and dedication that I admire so much.

The level of preparation that goes into that one race, one shot, one routine or one dive is off the scale. And people who haven’t done it can never really understand. It’s not dissimilar for a chef. It is the same formula which states that the level of preparation you put in is directly proportional to the success of the finished product. Which you always hope will be a triumph, of course!

August is generally a quiet month for me by choice, but this year I made an exception to cater a lavish party to celebrate the 60th birthday of our dear family friend Fiona Foley-Croft. 4 courses for 30 guests with the added complication that I was also a guest at the party. So more than ever the preparation was crucial as I would be handing over to another chef to finish the dishes and ensure everything was served as perfectly as I would want it to be.

For me it comes down to lists. I have always been a bit of a list queen: a daily to-do list, shopping lists, packing lists for holidays and the like. My sister Molly has always teased me about my list addiction and so it seems I have now found the perfect career to satisfy my predilection for itemising. Because when it comes to cooking there are always lots of lists. And the most important of all is the prep list.

In restaurants this is sometimes called the MEP or ‘mise-en-place’ list and it deals every little thing that has to happen ensure the food is cooked and gets to the table on time. It does not say for example, “cook dhal” or “roast lamb”. Each dish is broken down into its component parts, so it would say, “wash lentils; slice onions, garlic, chillies; boil lentils and add spices; fry onions and garlic; garnish and serve”.

For a chance to re-create a simplified version of the birthday dinner I created for Fiona, featuring a 3-hour Scotch Bonnet roast lamb shoulder, tandoori tiger prawns, baba ghanoush, salads, raitha and naan bread finished with a delicious Eastern Mess dessert, simply follow the steps below.

24 hrs before the event

  1. Make lamb marinade
  2. Marinade lamb shoulder
  3. Defrost tiger prawns in the fridge (if necessary)

4 hrs before service

  1. BBQ / slow-roast lamb shoulder (3 hrs minimum)
  2. Clean and prepare prawns if necessary
  3. Marinade prawns in tandoori style marinade (turmeric, chilli powder, paprika, ginger paste, lemon juice, salt and natural yoghurt). Cover and leave in fridge until required.
  4. Roast aubergines for baba ghanoush – 1 hour at 190ºC.
  5. Make rosewater berry sauce for Eastern Mess (berries, icing sugar cornflour, rosewater) and pass through a sieve to remove seeds. Store in a squeezy bottle or pouring jug and allow to cool to room temperature.
  6. Chop or break up meringues for Mess and keep in a food bag until required.
  7. Whip Chantilly cream for Mess. Decant into piping bag or a bowl, cover and place in fridge until required.
  8. Wash, prep and slice berries – cover and leave at room temperature.

2 hrs before service

  1. Remove aubergine flesh from skins, roughly chop and add to a bowl. Finely dice red onion, garlic, chilli, and chop fresh coriander. Season with sea salt and freshly squeezed lemon to make baba ghanoush. Cover with cling film and chill.
  2. Whiz 1 bunch coriander, 1 peeled garlic clove, 1 hot green chilli, pinch of sea salt, 1 tsp sugar in a blender. Add natural yoghurt to make raitha. Pour into serving bowl, cover with cling film and chill in fridge.

1 hour before service

  1. Prep items for green salad (iceberg lettuce, cucumber, celery, spring onions) and arrange in a service bowl.
  2. Finely slice red onion and add to sliced tomatoes and washed rocket leaves. Dress with sea salt, lemon juice and cold-pressed rapeseed or olive oil.
  3. Remove lamb shoulders from BBQ / oven and wrap tightly in foil and allow to rest for 30 minutes.

When guests arrive

  1. BBQ / pan fry prawns, depending on size around 2 minutes each side
  2. Pull lamb from bone and arrange on a platter
  3. Heat naan breads in oven for 5 minutes
  4. Construct Eastern Mess (meringue, berries, Chantilly cream, berry sauce and garnish)
  5. Pour glass of wine for self and enjoy the party!

In a tribute to all our Olympians, my Eastern Mess recipe is given below. This is a recipe I have lovingly borrowed from my favourite Persian chef, Sabrina Ghayour, from her debut cookbook Persiana, published by Mitchell Beazley. I garnished them with golden sugar nibs to add the appropriate level of bling befitting an Olympic week. These are available from Waitrose – Cook’s Ingredients Bronze Sugar Nibs – but I think they look more like gold! I hope you enjoy the rest of the Games and that my recipes can help you plan a hassle-free summer menu to enjoy with friends and family.

The other recipes in this menu are available to view at smallaubergine.com For more of my recipes check out Kitchen Favourites with Saira: Chilli; Ginger and Garlic. Available to buy via amazon.co.uk

Eastern mess serves 8

Ingredients

  • 600 g mixed berries (e.g.: strawberries, raspberries, blackberries)
  • 4 tbsp icing sugar
  • 2 tsp cornflour
  • 2 tsp rosewater
  • 600ml double cream
  • 1 tsp vanilla extract
  • 8 meringues (home-made or shop-bought)
  • Choose from crunchy sugar nibs; toasted almonds, pistachio kernels or toasted oats for garnish

Method

  1. First make the rosewater berry sauce. Take 250g of the mixed berries and place into a small saucepan with 2 tbsp of the icing sugar and 2 tsp cornflour. Heat gently with some water, no more than 50 ml. You can use frozen berries for the sauce, but leave out the water. Gently simmer the berries for 15 minutes until they are completely soft. Taste the sauce and add more icing sugar if you like it sweeter.
  2. Pass the sauce through a sieve until you have a smooth sauce and set aside to cool. Once cooled, add 1 tsp of rosewater and taste. Only add the second teaspoon if you like the favour and want to make it stronger.
  3. Whip the double cream with the remaining 2 tbsp icing sugar and vanilla extract until holding its shape in soft peaks.
  4. Prepare the remaining berries and get ready to construct the dessert. Use a pretty glass bowl or glasses for maximum effect.
  5. Break or chop the meringues into bite-sized pieces. Start with meringue in the bottom of the glass, then add the fresh berries, whipped cream on top and a good drizzle of the rosewater berry sauce. Top the desserts with something crunchy, gold sugar nibs are a particular favourite for me, but you can use toasted nuts or oats or even crystallised rose petals if you can find them.

Velkommen til Norge

We’ve just come back from Norway. We went to visit our friends Inger-Anne, Jan-Erik, Astrid and Ingeborg who live in Oslo. When we lived in Cairo, my daughter Lily and Astrid were great friends and when planning a surprise trip for Lily to celebrate the end of her exams, it seemed the obvious choice. I have visited Norway many years ago with my parents but that was a long time ago and I only had vague memories of the place.

So we were delighted to arrive in Oslo to be met with glorious sunshine. We managed to get ourselves on a train to Skøyen where our friends lived. Norway is one of those countries where everyone seems to speak perfect English which makes life very easy for British travellers. It was incredibly easy to find our way around; the signs were in English and the dual-language announcements on the train meant there was no excuse to miss our stop.

We arrived on a stunningly beautiful day and it seemed that every stunningly beautiful Oslo resident was out in the city’s green spaces or waterfront areas sunbathing, eating, drinking and generally having a whale of a time. Our hosts prepared us a lovely buffet lunch and then offered to take us out on their little boat for a quick water-tour of Oslo followed by coffee and cake at their little cabin on an island called Lindøya. It was a fairly easy decision!

The little cabin turned out to be a picture-perfect wooden house with a large garden and a gorgeous sea view, 2 bedrooms, small kitchen, lounge complete with woodburner, shower room and a technological marvel known as an electric toilet. I honestly can’t remember the last time I was so impressed by a toilet. The coffee was top notch (as it always is in Norway I was to discover – no instant coffee granules in sight) and the cake was a pavlova covered with piles of fresh strawberries, raspberries and blueberries.

Lindøya was originally an escape for the workers in 1920s Oslo who would row over to the island and spend the summer in tents to escape the poor air quality of their industrial working conditions. Eventually the city council allowed them to build wooden cabins on their plots and the structures have remained pretty much unchanged since that time. There are no cars or bicycles allowed on the island, cabins are not allowed to be expanded or changed outside the original footprints and many of the owners are now third generation family members of the original owners. It was truly a magical day topped off with a fantastic supper on the way home at a restaurant only accessible from the water where I had a local ‘fiskesuppe’ or fish soup with crusty white bread and a very cold glass of wine. Heaven.

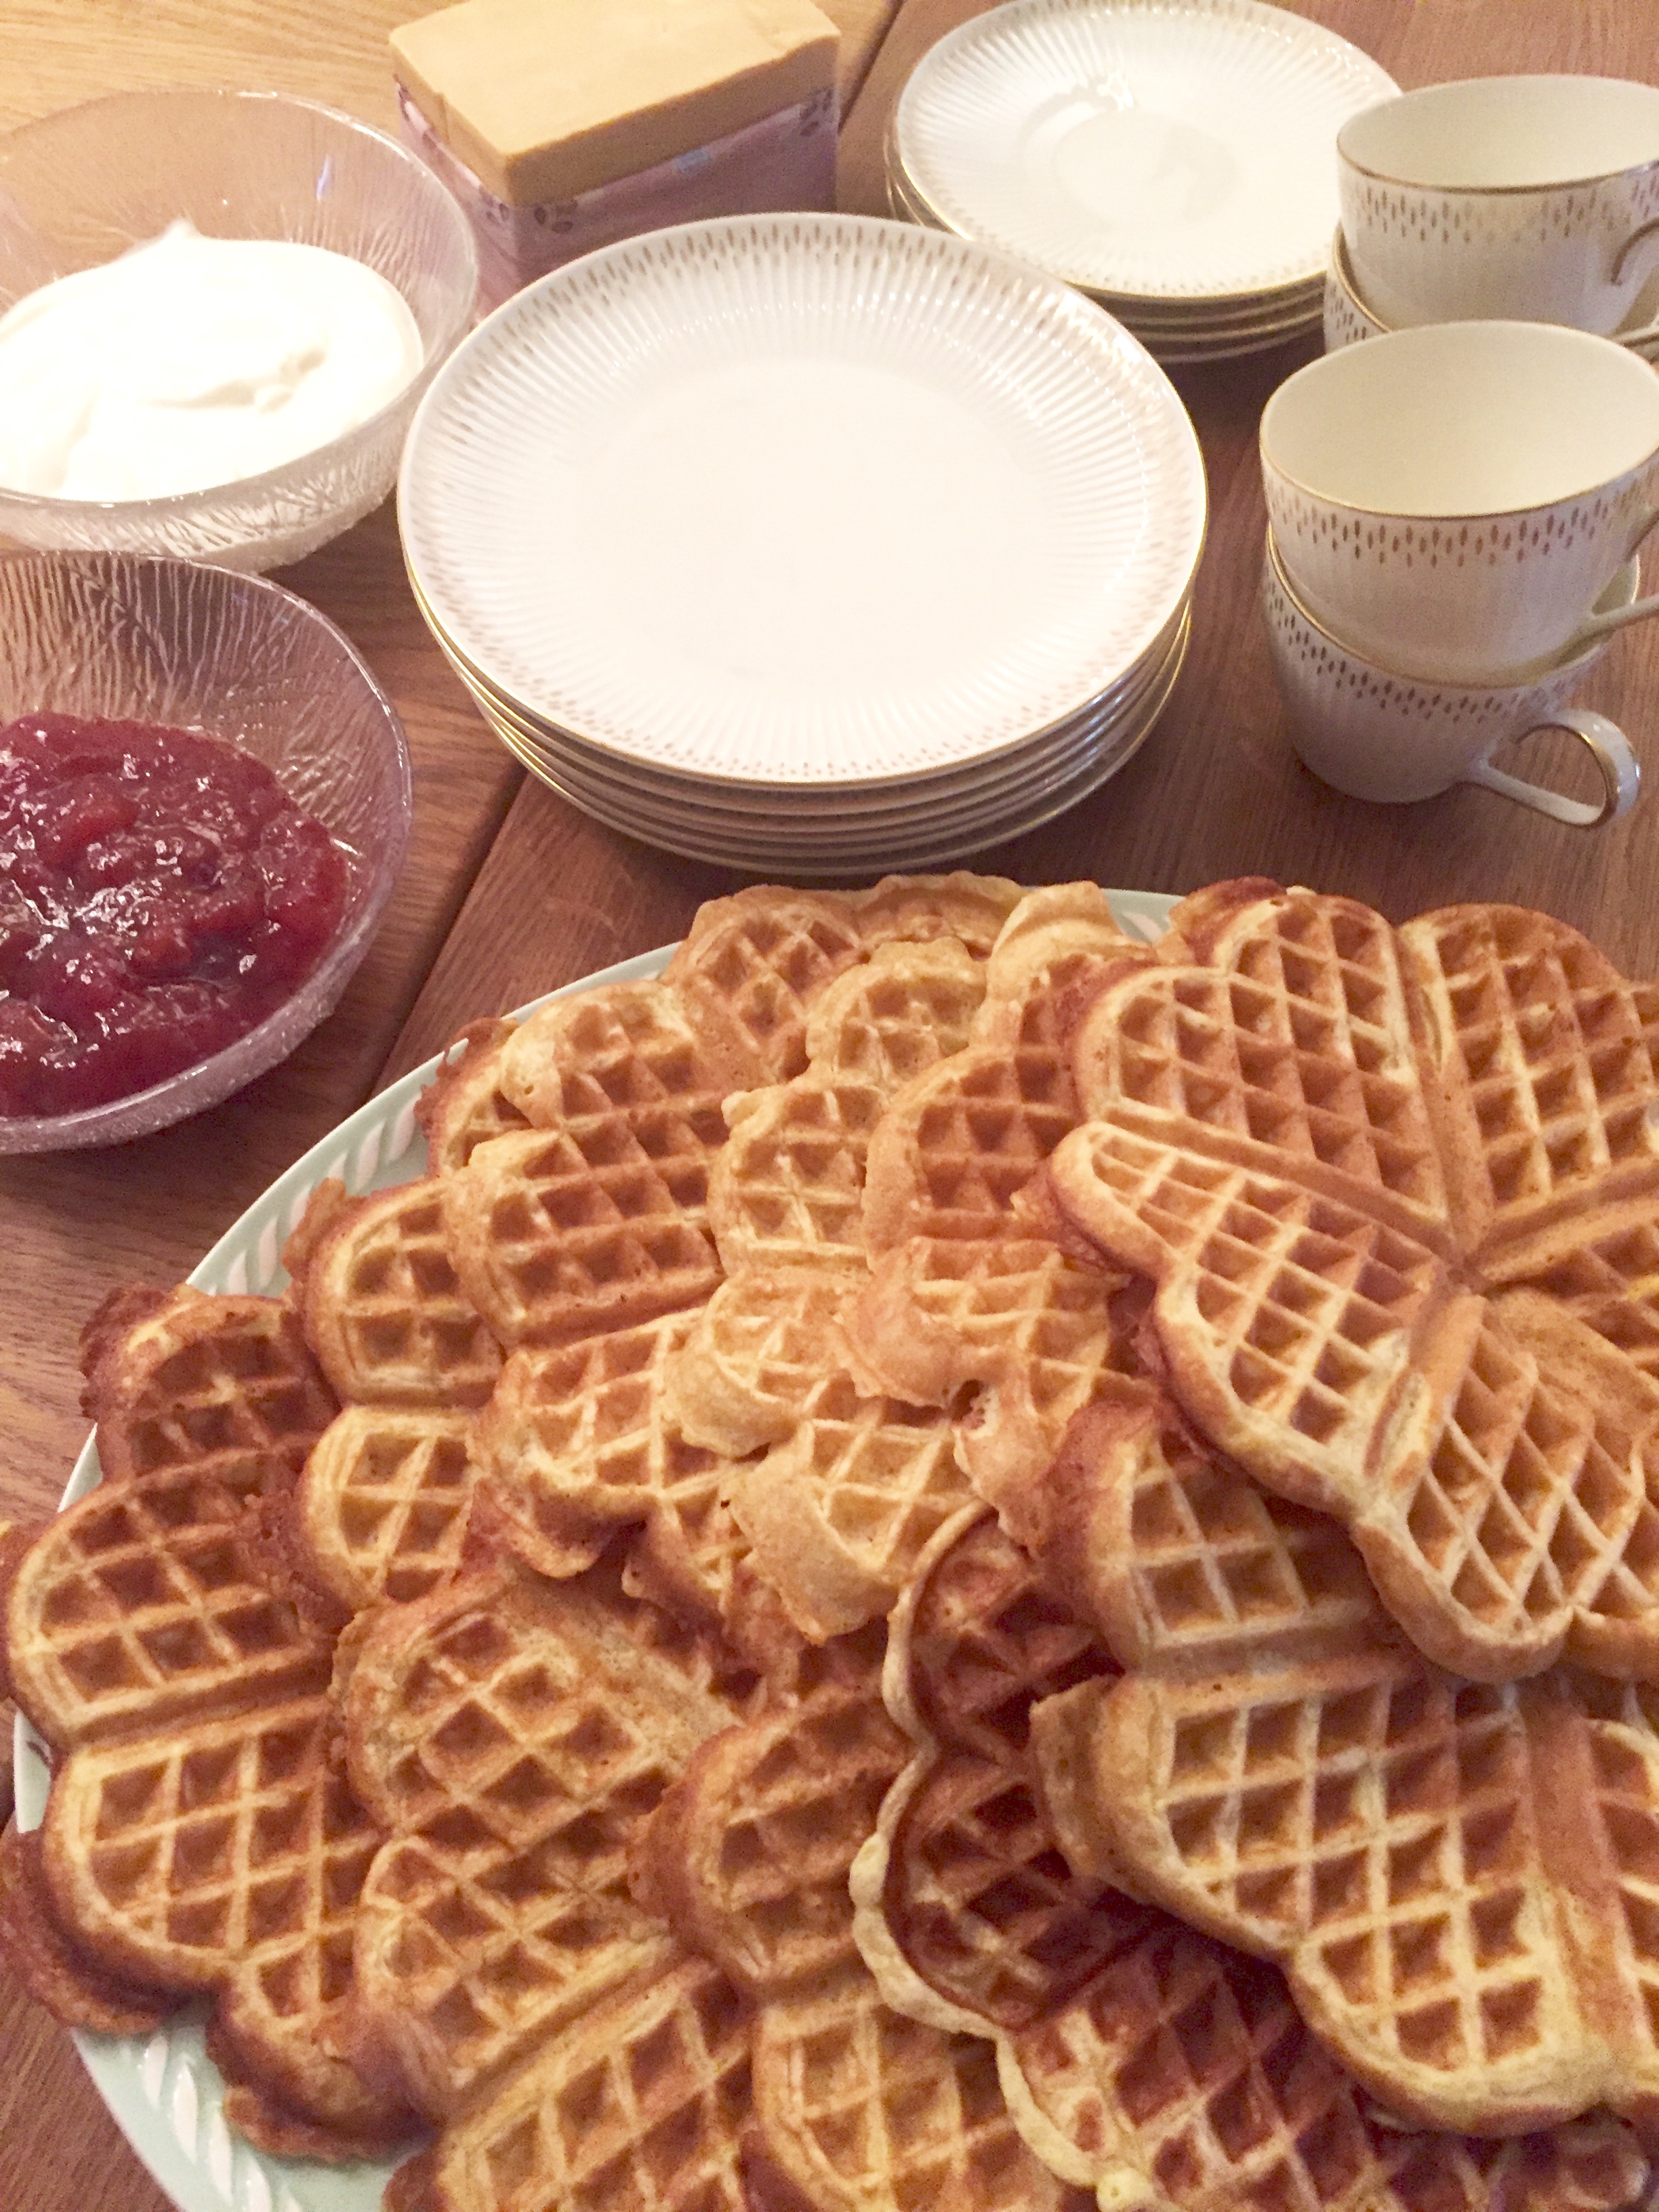
Another Norwegian speciality and a recipe I wanted to share with you is for ‘sour milk waffles’. It doesn’t sound too appealing but the sour milk is actually buttermilk whIch lends a great flavour and fluffy texture to the waffle and these are such a traditionally Norwegian thing to eat I had to share it with you.

The other traditional Norwegian dishes I was looking at were lutefisk – which is white fish, often cod, which is dried and brined and then soaked in lye, which gives it a gelatinous texture. Or maybe hvalbiff which was on the menu at the restaurant we ate in, which was whale meat served with boat potatoes and steamed vegetables.

So I thought the waffles would be best! The waffle mix smells lovely even before you cook it. Inger-Anne says for her it is the smell of childhood as they used to have these waffles all the time for any school events, festivals or perhaps at as a teatime treat at home. Every Norwegian household has a waffle iron but these could be made in a frying pan so don’t let that stop you. Serve these waffles with butter, strawberry or raspberry jam and sour cream. Or to be really traditional you could try them with a bit of brunost – which is Norwegian brown cheese and is completely delicious. Made with cows or goats milk, it is a soft-set cheese sold in a block with the same sort of texture as Port Salut. It taste a lot better than it sounds, which a delicate and slightly caramel-sweet flavour. If you come to Norway you must try it!

Served with coffee and always eaten with fingers, never a knife and fork, sharing and eating waffles is a big part of Norwegian food culture and one I was very happy to partake in. Have a go yourself for a brunch or teatime treat.

Norwegian waffles 

Ingredients

100g butter

4 eggs

200g granulated sugar

1 litre buttermilk

2 tsp bicarbonate of soda

500g plain flour

Method

Melt the butter the set aside for 5 minutes to cool down slightly

Place the eggs and sugar in a mixing bowl and whisk lightly by hand until well combined together but not fluffy. Inger-Anne told me not to use a mixer for this. For waffles you must do it by hand.

Add in the buttermilk, bicarbonate of soda and the melted butter and whisk to combine.

Then add in the flour in stages, approximately a third at a time and whisk again to combine so it is fully incorporated without any lumps. You then must leave the mix aside for 30 minutes to develop before starting to cook it.

To make the waffles, thoroughly pre-heat the waffle maker and brush with oil or cooking spray. If you don’t have a waffle iron these can of course be made in a frying pan like American pancakes or drop scones – you will miss out of the pretty pattern but the flavour will still be the same.

Cook them for around 2 minutes on each side over a medium-high heat. Once both sides are golden brown you can take them out and rest on a wire rack briefly before serving warm and eating with butter, jam and sour cream.

Super summer salads

I have been thinking a lot about my forthcoming holiday lately and thinking I should probably go on a bit of a health kick in advance of the excesses that will no doubt ensue when I am surrounded by the culinary delights that Provence has to offer. In theory it should be easier to eat healthily during the summer months, but in practice I find this is rarely true.

But there is no doubt that the availability of fresh produce and the warmer temperatures make a good environment for some lighter meals, so I wanted to focus on a healthy theme for this blog. I had the perfect excuse to get creative with salads over the weekend as I was invited to a BBQ hosted by one of our neighbours for the residents of ‘our road’. We have these neighbourly events fairly regularly and it is great to get to know some of our neighbours a bit better. Some people (yes, I mean you Jim) will maintain that BBQs are all about the meat, but I would have to disagree. The meat for me is merely an excuse, a foil if you will, for the vast array of salads which I feel should be present at this sort of al-fresco dining event.

There always has to be a green salad of mixed leaves; this is the staple salad of any BBQ spread. My top tip for lettuce is to always serve it dry, if it is wet then the dressing will never cling to the leaves. If you don’t have a salad spinner to dry your lettuce after washing, I would recommend investing in one. I always make a tomato salad separately because I love the juicy sweetness of tomatoes in the height of their season and they don’t always stand up well when mixed with other crunchy vegetables. My salad is adapted from a Ree Drummond recipe (my favourite cowgirl cook) in which the tomatoes are marinated for an hour or two at room temperature with very finely sliced spring onions and lots of fresh basil and/or parsley in a dressing made from extra virgin olive oil, balsamic vinegar, light brown sugar and seasoning.

This is an amazing combination and the dressing is particularly good for being mopped up with crusty white bread at the end of the meal. My top tip for tomatoes is never to store them in the fridge. They taste so much better at room temperature; their natural sweetness will come through much more. Try mixing up the types of tomatoes in your salad; different colours and sizes or even heritage tomatoes if you can find them, make the visual impact much greater and the flavours better too.

Another beautiful salad is one that my Canadian friend Christine makes. She tells me it is originally a recipe by Rick Stein from one of his European odysseys, but I’ve always considered it to be hers! This salad combines canteloupe melon, cucumber, tomato, crumbly goats cheese and fresh mint leaves and is finished with a dressing made from olive oil, red wine vinegar, caster sugar and salt and pepper. The combination of sweet melon and salty goats cheese, seasoned with lots of freshly ground black pepper is a complete revelation and delicious on its own for a light lunch.

And the third salad I made uses one of my favourite summer ingredients, peaches. For me peaches and nectarines, which work equally well in this salad, are the taste of summer. They remind me of European holidays as a child, where I was amazed by the intense flavour and juiciness of these stone fruits when eaten in Greece or Spain on a hot sunny day. Although the flavours of peaches bought in this country is not always so good, in this recipe they are grilled and peeled which increases the intensity of the flavour. Mixed with rocket, feta cheese and crispy prosciutto or Parma ham in a balsamic vinaigrette this was the biggest hit with my neighbours on the day!

So here are the recipes – I hope you enjoy making them too.

Marinated tomato salad

6-8 ripe tomatoes, sliced

4 spring onions

150ml extra virgin olive oil

60ml balsamic vinegar

2 tbsp light brown sugar

1/2 tsp sea salt

1/2 tsp ground black pepper

handful fresh chopped basil and/or parsley, finely chopped

Method:

  1. Cut the tomatoes and arrange in a shallow bowl. Slice the spring onions very finely and scatter on top.
  2. In a screw top jar, add all the dressing ingredients and shake together until well combined.
  3. Pour the dressing over the tomatoes and leave to marinate for 1-2 hours at room temperature before enjoying.

Melon & goat’s cheese salad

1/2 canteloupe melon

1/2 cucumber, peeled and sliced

2 vine tomatoes, de-seeded and sliced into wedges

150g crumbly goat’s cheese

12-14 mint leaves, roughly torn

60ml virgin olive oil

1 tbsp red wine vinegar

1/2 tsp caster sugar

salt & pepper

Method:

  1. Slice the melon, cucumber and tomatoes and arrange on a serving platter.
  2. Crumble the goat’s cheese on top then scatter over the torn mint leaves.
  3. Whisk together the dressing ingredients until well combined then drizzle all over the salad.
  4. Season with some more freshly ground black pepper then enjoy.


Rocket, peach and feta salad

200g feta cheese, cut into cubes

6 slices prosciutto / Parma ham

100g rocket leaves

4 peaches or nectarines

3 tbsp balsamic vinegar

4 tbsp extra virgin olive oil

salt & pepper

Method:

  1. Whisk together the dressing ingredients and season well with salt & pepper.
  2. Grill the prosciutto under a hot grill until crisp and remove to a plate to cool.
  3. Cut the peaches into quarters and remove the stones, then place under the hot grill, skin-side up for 3-4 minutes until the skins blacken.
  4. Take the peaches out and remove the skins with a paring knife. They should come off very easily.
  5. In a serving bowl, place the rocket leaves and toss with half of the dressing.
  6. Arrange the peach slices, scatter over the feta cheese and then chop the crispy ham into thin slices and scatter over the top.
  7. Drizzle with the remaining dressing and serve.

Coronation Chicken

To celebrate Her Majesty the Queen’s 90th birthday and the Patron’s lunch today I have revised a classic recipe. You could call this a retro fusion recipe, originally thought to have been created for the silver jubilee of the Queen’s grandfather George V in 1935. Coronation chicken is a cold dish often used in salads and sandwiches and is one of the only dishes that I will use curry powder for! The mix of the gentle spices with the creamy mayonnaise, tender chicken and sweet fruit has been enjoyed for decades and is still one of my husband Jim’s absolute favourites. Poaching the chicken is a great way to cook to add gentle favour and ensure the chicken stays very moist. The recipe can of course also be made with leftover cold chicken from a roast dinner or other meal as well.

Enjoy the dish and many happy returns to her Majesty. ?

Ingredients (serves 2)

115g dried fruit (I used a mix of golden sultanas and dried apricots)

1 large chicken breast (approx. 250g)

2-3 slices ginger root

4-5 black peppercorns

1 small onion, thickly sliced

Enough cold water to cover the chicken in the pan

6 tbsp mayonnaise

1 tbsp salad cream

1 tsp mild or medium curry powder

salt and freshly ground pepper

juice of half a lemon

Method

  1. First poach the chicken. Place the sliced ginger, onion, peppercorns in the pan. Add the chicken breast and cover with cold water.
  2. Bring to the boil, reduce to a simmer, cover the pan and poach the chicken for 15 mins.
  3. Then turn the heat off and allow the chicken to continue cooking in the pan for another 10 minutes.
  4. Check chicken is cooked all the way through, using a meat thermometer which should read  a core temperature of 75ºC in the middle of the chicken. Or you can cut open the chicken and check the chicken is completely cooked through with no pink traces at all.
  5. Take the chicken out of the pacing liquid and allow to cool to room temperature (60 mins) and then refrigerate until completely cold. Cut chicken into bite sized pieces or slices, around 2cm wide.
  6. Mix together the mayonnaise, salad cream with the curry powder then season with salt if needed and plenty of fresh black pepper.
  7. Add in the chopped chicken and dried fruit and stir very well. Finally add a squeeze of lemon juice.
  8. The filling is great in vol au vents or as a jacket potato filling, but the classic use is as a sandwich filling. I like crusty white bread with shredded crunchy iceberg lettuce for a great combination.

Exam stress-busting recipe

Well the time has finally arrived. My daughter’s GCSE exams have started, so as you can imagine the stress levels in our house are through the roof. It seems hard to comprehend that she has come to this point already. Through my happy tears at her Leavers’ Assembly, I found it hard to process the fact that she has become this rather wonderful young adult when it seems like yesterday that she stood proudly in the playground on her first day at school, with her unruly hair in braids and fiercely clutching her brand new book bag.

I have asked several friends how to cope with the stress and what I should be doing as a parent to alleviate the symptoms, though clearly I can do nothing about the cause. I read somewhere that whatever you say as a parent will be wrong. If you seem very caring and interested in what they are doing and get involved in revision, you are stifling them and poking your nose in and you couldn’t possibly understand. If you try and stay out of it you are accused of not caring. So parents should just accept that whatever you say will be wrong and get used to the sound of slamming doors.

My friend Sue from the Lemon Tree explained that her strategy with her son Harry was just to feed him. That was the best thing she could do to support him with his workload. This sounded like a good idea to me so I am planning to cook all the things that Lily likes and that I think will help her work and function as effectively as possible. We’re always told that fish is great brain food, and it’s not always the easiest thing to get our children to eat, so I thought I would share my family fish pie recipe with you. It’s got all that lovely fish, but couched in a wonderful cheesey mash and a silky parsley sauce which makes it one of my all-time favourite comfort foods too. I’ve used white fish, salmon and prawns in my recipe, as the children are not mad-keen on smoked fish, but some lovely smoked haddock in the fish mix also works a treat.

Here’s the recipe for you. If you are one of those households supporting stressed-out, exam-crazed teenagers, give it a go and hopefully it will allow them to relax for a minute, get some good fuel inside them before they launch back into the study and revision. Good luck to them all!

Fish Pie

Ingredients (serves 4)

500ml milk

300g salmon fillet

300g white fish (cod or haddock)

125g raw large prawns, peeled and de-veined

1 small onion, quartered

1 bay leaf

4 black peppercorns

75g butter

50g plain flour

handful of finely chopped fresh parsley

salt and pepper

200g washed baby spinach (optional)

1 kg potatoes (Maris Piper or King Edward are best)

50g butter

50ml milk

50g grated mature cheddar cheese

Method

  1. Heat the milk in a large shallow pan. Heat the milk to just short of boiling – you should just see a few small bubbles around the edges of the pan. Add the fish in large chunks (approx. 4cm) along with the onion and bay leaf and 4 black peppercorns. Reduce the heat and simmer for 8 mins, turning the fish once during that time. Lift the fish onto a plate and strain the milk into a jug to cool. You will need approx. 450ml milk, if there is slightly less top it up with fresh milk. Flake the fish into large pieces in a large ovenproof dish. Then add the raw prawns and mix thoroughly.
  2. Make the parsley sauce. Melt the butter in a pan very slowly then add the flour and stir well until you have a paste. Add the reserved milk from poaching the fish very gradually, stirring briskly all the time. Keep the heat on and keep stirring until the sauce thickens, this should take about 5 minutes. When the sauce is thick enough to coat the back of the spoon you can take the pan off the heat, season with salt and pepper and add the finely chopped parsley.
  3. Scatter the spinach leaves on top of the poached fish, then pour the sauce over the fish mix in the baking dish, making sure the fish and spinach are completely covered in the sauce. Now preheat the oven to 180ºC (fan).
  4. Peel and chop the potatoes into big chunks the cook in salted, boiling water until soft and cooked through. This should take 25-30 minutes. Drain off the water and allow the potatoes to dry off in the open pan. Then mash with the butter and 50ml of milk and season well with salt and pepper.
  5. Finally add the mashed potato to the top of the fish, scatter over the grated cheese and bake in the oven for 40 minutes until golden and bubbling on top. Serve with peas or any steamed green vegetables.

Easter traditions

Whilst watching the valiant efforts of the Harlow U12s at the Braintree Festival of Rugby this weekend, I asked one question to several players and parents, “What’s the best thing about Easter?” I had a variety of answers but several themes emerged. My son Tommy went for the Easter Feast, with a particular mention of roast lamb; Asa who was nursing a sore knee in the tent said for him it had to be the chocolate; Dax, one of our coaches and Sarah the team manager decided the best thing about Easter was 2 days off work!

I’m starting to think I might prefer Easter to Christmas these days. I really look forward to it. I think it’s something to do with the fact that most of us have the whole long weekend off, and, of course, it’s always a weekend! Also unlike Christmas, you don’t really have to do anything specific, which let’s face it can make the Yuletide celebrations quite exhausting, particularly if you are the designated cook. I find that most families have their own traditions at Easter, and they vary significantly.

If you have been watching Mary Berry’s new programme, ‘Easter Feast’, you may be as interested as I have been to see some of the varied Easter food traditions from different communities. There is Jamaican loaf-cake called Bun served with cheese, Russian Pashka cheesecake, Polish Babka cake and Greek Tsoureki bread as well as the traditional English treats such as Hot Cross Buns and Simnel cake, with its 11 marzipan balls to represent the 11 apostles of Christ. Easter food is redolent of the coming of spring, the symbology is all about re-birth and new life whether we observe the religious festival or not. And for people that have given up certain foods for Lent, Easter really is something to look forward to after a period of abstinence.

For me, there are probably two staples of our Easter eating. The first is roast lamb, which to be fair I like to have all year round, but there is a special significance to lamb at Easter with all its Spring imagery. Sorry to burst your bubble, but actually the best time for British lamb is a bit later in the year, around May to July. It’s obvious when you think about it, lambs are being born in February and March so they won’t be ready for the table for a few months yet. Of course New Zealand lamb is always available, and I have no issue with eating it. British lamb is available this Easter but it tends to be indoor-reared and a little lacking in flavour at this time. Not a problem if you introduce lots of flavour into that leg of lamb with garlic and rosemary or maybe lemon and oregano for a Greek twist. Or if you want to have a spicy take on your Easter roast, why not try my Scotch bonnet roast lamb in my new cookbook Kitchen Favourites with Saira: Chilli.

And my absolute favourite is the hot cross bun, which seem to start appearing in the shops around Valentine’s Day these days, but I have no issue with that. The longer we can get them the better as far as I am concerned. There has been a worrying recent trend toward adulterated hot cross buns, which I sincerely hope is just a fad. I mean; chocolate hot cross buns? That is wrong on every level. And though I cannot deny Heston Blumenthal’s genius in certain food matters, including space food, I am dead against his experiments with this British classic. Acacia honey and ginger? Earl Grey and mandarin? No, thank you very much.

I prefer to keep it simple, and I would encourage you to have a go at making your own hot cross buns this year. It is much easier than you might think, particularly if you have a stand mixer with a dough hook attachment. I think these classic buns with a good spread of real butter are one of Britain’s finest inventions. There is nothing quite like a bite of a home-made bun, if you’ve never baked them before, make this the year to enjoy a spot of family baking on one of those lovely days off. Enjoy.

Classic hot-cross buns

Ingredients (makes 8 buns)

500g strong white bread flour (+ extra for kneading)

½ tsp salt

2 tsp ground mixed spice

50g caster sugar

50g butter cut in cubes

150g sultanas or mixed fruit

50g candied mixed peel

7g sachet fast-action yeast

200ml warm milk

2 medium eggs

for the crosses – 3 tbsp plain flour mixed with 3 tbsp water, enough to make a thick paste

for the glaze – 2 tbsp golden syrup, warmed through

Method

  1. Place the flour in a bowl and mix in the salt, mixed spice and sugar. Then rub in the butter with your fingertips until combined and stir through the mixed fruit and peel. Then sprinkle over the yeast.
  2. Warm the milk either in a pan or with 30 second blasts in the microwave. It should be hot enough that when you dip a finger in, it is uncomfortable, but not hot enough to scald.
  3. Beat the eggs into the warm milk briskly, then pour into the flour mixture and bring the dough together with wooden spoon.
  4. Now to knead the mixture. By hand it will take 7-8 minutes; in a mixer only half that time. Set a timer and make sure you knew it for long enough – 8 minutes is a long time when you’re kneading! Sprinkle some extra strong flour if the dough is sticky, but try not to use too much as it will affect the lightness of the finished bun.
  5. I only prove the buns once, but if you have time you can prove the dough twice. For the single-prove method, divide the kneaded dough into 8 balls and shape into buns. Place on a lightly oiled baking sheet, cover with oiled cling film and then set aside in a warm place to prove for and hour and a half.
  6. Pre-heat your oven to 210ºC (fan) whilst you make the flour paste for the crosses. Mix it together and use a piping bag (or a plastic food bag) to pipe crosses onto each bun. Bake the buns in the oven for 13-15 minutes until well risen and golden brown all over. Cool down on a wire rack.
  7. Finally, glaze the hot buns with the warm syrup before serving with lashings of butter and a nice cup of tea.

St David’s Day

Hapus dydd Dewi Sant – or Happy St. David’s Day!

Some of you will know that I am a Welsh girl at heart, born in the Rhondda valley and very proud of it too. Today is St David’s Day celebrating the patron saint of Wales, so what better reason to indulge in one of my favourite vegetarian dishes, Glamorgan sausages. This recipe uses Caerphilly cheese which is a unique and delicately flavoured cheese. Caerphilly is a hard, and crumbly white cheese which works really well in this dish. It is traditionally made in South Wales and has a beautiful tangy flavour.

It can be difficult to find sometimes, a good supermarket cheese counter will have it, and you will almost certainly find it at any good cheese shop. If you really can’t find it, a mixture of crumbly Cheshire and a good strong farmhouse cheddar will work.

Enjoy this Welsh classic today or any day…

Saira x

Glamorgan sausages

Ingredients

  • 1 small leek finely chopped, and sweated in a large knob of butter
  • 125 gms white breadcrumbs + extra for rolling
  • 100 gms Caerphilly cheese, finely grated
  • 2 eggs, beaten  + 2 more for crumbing
  • Rounded dessert spoon of whole grain mustard
  • Salt and pepper to taste
  • 2 tbsps flour
  • Vegetable oil for shallow frying

Method

  1. Sweat the leek gently over a low-medium heat for 8-10 minutes until completely soft but not coloured.
  2. Mix with the breadcrumbs, cheese, eggs and mustard and mix really well together. Form into 12 fat sausage shapes and chill in the fridge for 30 minutes.
  3. Place the flour on a plate and season well with salt and pepper. Roll the sausages in the seasoned flour.
  4. In two shallow bowls, place the beaten eggs and the breadcrumbs.
  5. Roll the sausages in the egg then in the breadcrumbs until they are completely covered.
  6. Shallow fry carefully until golden brown all over, should take around 10 minutes.